How to Troubleshoot Horse Trailer Lights: Step-by-Step for Your Featherlite 8549
When your Featherlite 8549’s lights start acting up, it’s not just an inconvenience—it’s a safety hazard on the road. Faulty trailer lights can lead to failed inspections, fines, or worse, accidents. This guide walks you through common electrical issues specific to the Featherlite 8549, from corroded ground wires to blown fuses, so you can diagnose and fix them yourself.
Why Are My Featherlite 8549’s Tail Lights Dim or Flickering?
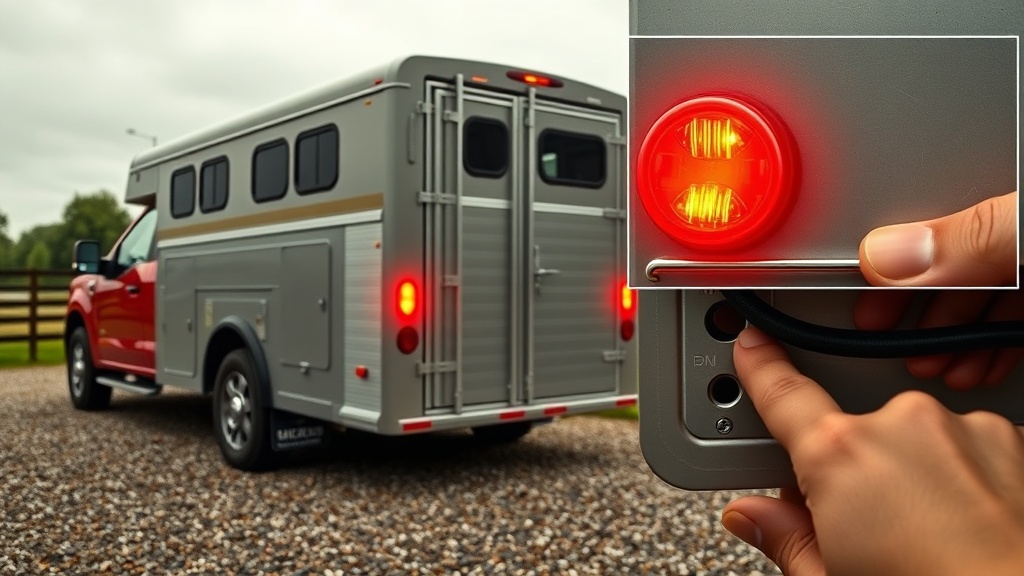
Dim or flickering lights usually point to a poor ground connection or voltage drop. The Featherlite 8549 uses an aluminum frame for its construction: aluminum frame and skin, which doesn’t conduct electricity as well as steel. Over time, corrosion builds up at the ground points where the light housings bolt to the frame. Start by checking the ground wire on each tail light—it’s typically a white wire attached to a screw. Remove the screw, clean the area with a wire brush, and reattach with a dab of dielectric grease. If that doesn’t fix it, test voltage at the light socket with a multimeter. You should see 12-13 volts DC when the truck’s lights are on. Anything under 11 volts is a sign of a wiring issue, often in the 7-pin connector or the trailer’s main harness.
What Causes the Featherlite 8549’s Brake Lights to Stay On?
If your brake lights remain illuminated even when you’re not braking, you’re likely dealing with a short circuit or a faulty brake controller. On the Featherlite 8549, the brake light circuit runs through the 7-pin connector’s blue wire (brake output) and the trailer’s junction box. First, disconnect the trailer from the truck and test the light assembly directly with a 12V battery. If the brake light is still on, the internal switch in the light housing is stuck—common on LED units where moisture gets in. Replace the sealed LED assembly; it’s a direct swap. If the light works fine with a battery, the issue is in the truck-side brake controller. Check if the controller’s gain is set too high, which can cause a constant low-voltage signal. Reset it to the manufacturer’s spec (usually 3-5 volts minimum) and test again. Also, inspect the safety: brakes and breakaway systems for any frayed wires that might be grounding out.
How Do I Fix a Blown Fuse in My Featherlite 8549’s Light System?
Blown fuses usually indicate a short circuit or an overloaded circuit. The Featherlite 8549’s light system uses a dedicated fuse in the truck’s fuse box (often labeled “Trailer Lights” or “Trailer Battery”). But the trailer itself doesn’t have its own fuse for the running lights—that’s handled by the truck. If you keep blowing the truck’s 15-amp fuse, disconnect the trailer’s 7-pin connector and check for a pinched or bare wire where the harness passes under the featherlight chassis. On the 8549, the wiring runs along the frame rail near the spring hangers; look for chafing there. A multimeter continuity test between the battery negative and each pin in the 7-pin connector (with the truck disconnected) can find the short. For the brake light circuit, you might have a damaged light socket. If you find no external damage, try swapping the LED light assemblies—they rarely blow fuses, but a bad internal resistor can cause a spike.
Why Won’t My Featherlite 8549’s Turn Signals Work?
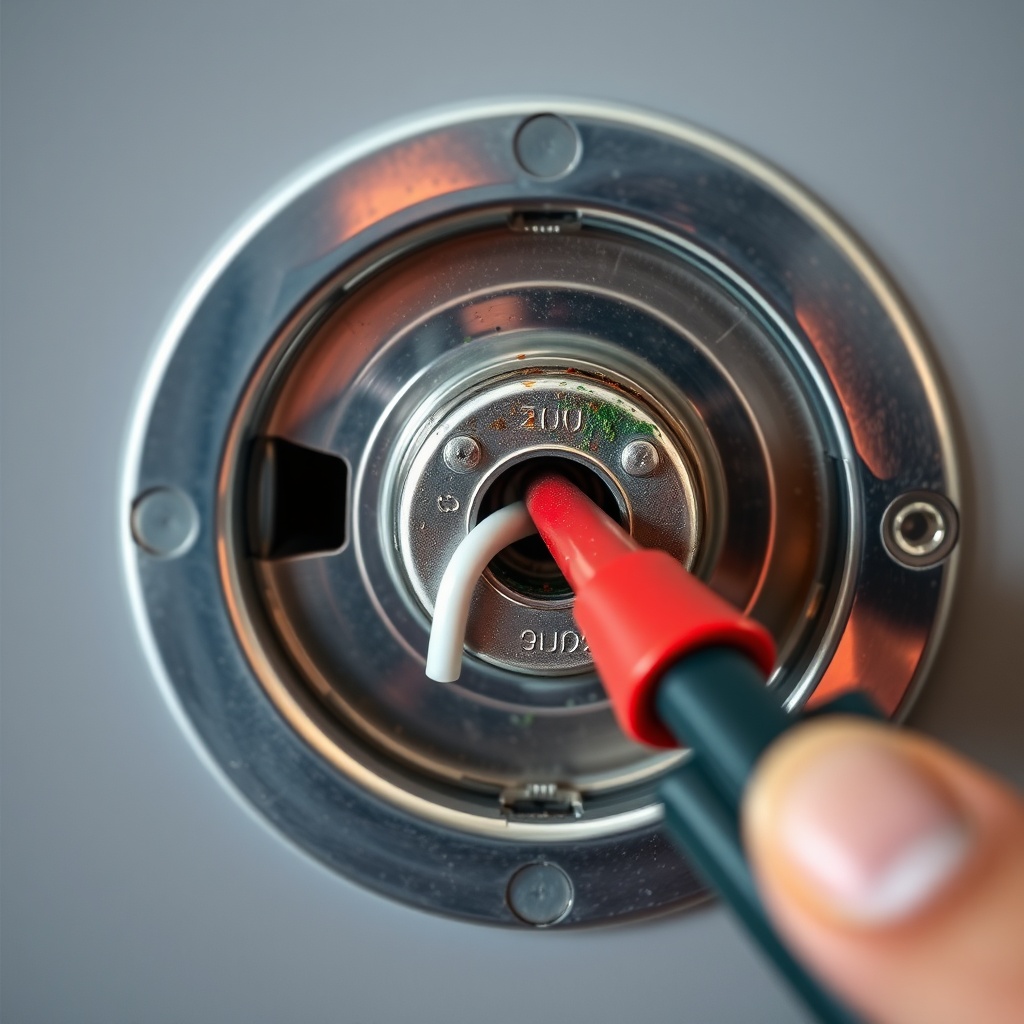
Non-functioning turn signals on the 8549 often trace back to the electronic flasher unit or a bad ground at the junction box. The turn signal circuit uses the truck’s flasher relay and the trailer’s wiring. Start by checking the bulb housings for corrosion—the Featherlite 8549 uses LED lights, which don’t burn out like incandescent bulbs, but moisture can still short the circuit. Remove the light lens and inspect for water damage. Next, test the 7-pin connector’s green wire (right turn) and yellow wire (left turn) with a test light while someone operates the truck’s switch. If you get power but the lights don’t flash, the truck’s flasher unit may need upgrading to one rated for LED trailers (many trucks default to an 18-amp flasher that doesn’t work well with low-draw LEDs). A common fix is swapping to a LED-compatible flasher relay—around £12–£25 from auto parts stores. Also, check the trailer’s ground at the junction box near the hitch.
| Troubleshooting Step | Estimated Cost (GBP) | Time to Complete | Severity Level |
|---|---|---|---|
| Clean ground connections | £0–£5 (wire brush, grease) | 15–30 minutes | Usually not urgent |
| Check 7-pin connector pins | £0–£10 (testing light) | 10–20 minutes | Usually not urgent |
| Replace fuse in truck’s fuse box | £2–£8 | 5 minutes | Needs attention soon |
| Swap LED light assembly | £25–£60 per unit | 20–30 minutes | Needs attention soon |
| Install LED-compatible flasher relay | £12–£25 | 15–45 minutes | Needs attention soon |
| Repair chafed wiring harness | £5–£20 (tape, connectors) | 1–2 hours | Needs attention soon |
How Do I Test the Featherlite 8549’s Breakaway Switch Lights?
The breakaway system on the Featherlite 8549 is a critical safety component—it applies the brakes if the trailer detaches. However, it also ties into the trailer’s light system. To test it, first make sure the trailer battery is charged (it powers the breakaway box). Find the breakaway switch near the hitch and pull the pin. You should hear the brakes activate (a solid clunk) and the trailer’s rear marker lights may flicker briefly. If the marker lights don’t come on, check the breakaway box’s connections. The 8549’s breakaway box has a red wire to the battery and a blue wire to the brakes. A corroded connection here can cause the lights to not work. Use a 12V test light to check for power at the breakaway switch. Also inspect the battery itself—many owners find the factory-supplied battery is small and dies quickly. For £30–£50, a Group U1 battery replacement is a solid upgrade. See our living quarters guide: sleeper and kitchenette for more on keeping the battery charged if you camp in the trailer.
How Do I Fix Water Ingress in My Featherlite 8549’s Light Housings?
Water in the light housings is a common issue on the Featherlite 8549, especially with the rear tail lights that are mounted low near the bumpers. Over time, the rubber gaskets between the lens and the housing dry out and crack, allowing rain or wash water to seep in. The first step is to remove the lens (usually two Phillips-head screws) and dry everything with a clean cloth. Check for corrosion on the LED circuit board—if it’s green or white, the board is damaged and the entire light assembly needs replacing. For a quick fix, clean the gasket area with rubbing alcohol and apply a thin bead of silicone sealant (non-acidic, automotive-grade) around the lip before reinstalling. This works for a few months, but the proper fix is to buy a sealed LED assembly with a higher IP rating (IP67 is ideal). These cost about £40–£90 each from Featherlite dealers or aftermarket suppliers. Also check the light mounting area for cracks in the aluminum skin where water could enter—a small dab of aluminum-grade filler can seal this, but for larger issues, refer to our build quality: construction details for repair tips.
What Featherlite 8549 Owners Say About Light Troubleshooting
“I had flickering marker lights for months on my 8549. Tried everything—cleaning grounds, new plugs. Turned out to be a failed LED driver in the left tail light assembly. Swapped the whole unit for £50 and haven’t had an issue since.” — Dan M., Newmarket.
“The most annoying thing was the brake light staying on after a wet trip. I finally pulled the lens off and found a tiny pool of water inside. Dried it out and sealed with silicone; that was 18 months ago and it’s still good. But I still carry a spare assembly in the tack room just in case.” — Lisa R., Hereford.
Frequently Asked Questions
What type of bulbs does the Featherlite 8549 use?
The Featherlite 8549 uses sealed LED light assemblies on all models produced after 2015. Earlier models may have standard 1157 bulbs in running/brake lights. Check your owner’s manual or look for the rectangular LED units with a clear lens.
Can I replace the Featherlite 8549’s lights with aftermarket units?
Yes, but match the mounting hole pattern (typically 4.5 inches on center for tail lights) and the electrical connector type (most use a round 2-pin or 3-pin Deutsch-style plug). Aftermarket units from brands like Optronics or Peterson work well, but verify the IP rating is at least IP67 for moisture resistance.
Why does my Featherlite 8549’s left turn signal flash faster than the right?
This is a classic sign of a failed LED on the left side, or a loose ground. Check the left rear light first—if one of the diodes inside the LED array is burned out, the total resistance drops and the flasher relay pulses faster. Test by swapping the left and right assemblies to isolate the issue.
How do I reset the breakaway system on my Featherlite 8549 after testing lights?
After testing the breakaway switch, simply push the pin back in. The brakes will release immediately, and the marker lights will stop flickering once the battery voltage normalizes. If the lights stay on after reinserting the pin, the switch may be stuck—tap it gently or replace the switch housing (around £20).
Is it safe to drive my Featherlite 8549 with one non-functioning marker light?
No. In the UK, a trailer must have all marker lights operational for roadworthiness. A single failed light can result in a penalty notice. More importantly, it reduces visibility to other drivers, especially at night. Fix it before towing, even if it’s just a temporary seal and clean.
Does the Featherlite 8549’s living quarters battery affect the trailer lights?
Not directly—the living quarters battery powers the interior lights, furnace, and fridge, while the trailer lights run off the truck’s electrical system through the 7-pin connector. However, if the living quarters battery is dead, it won’t affect exterior lights. But check the 7-pin connector’s auxiliary power pin (center pin)—if it’s corroded, it can’t charge the living quarters battery. Refer to our living quarters guide for wiring tips.